
Kitchen sink pipes. Are the drain pipes under your kitchen sink leaking? Or is it time to unclog the kitchen sink? Well, it’s time to get rid of that drip-catching bucket. Some leaks can be stopped by straightening the pipe and tightening the joints. However, if stripped nuts won’t tighten and old washers won’t seal because they’re too stiff and/or distorted, then replacing your under sink piping is the answer; and, it may not be as complicated as it seems. Since plastic pipe is inexpensive and relatively easy to install, the smart, reliable fix is to simply install a new drain assembly, especially if your existing pipes are old.
Tools Needed for Kitchen Sink Pipes Repair
The required tools for the project are as follows: a “4-in-1” screwdriver, a hacksaw, a level, pliers, “slip joint” pliers and a tape measure. Other tools MAY be required depending on what type of problems you encounter.
The required materials for the project are as follows: basket strainer, cardboard washer, locknut, plumber’s putty, rubber washer, tailpiece, tailpiece washer and PVC waste arm. These items are described in more detail further down in the article, and you should be able to buy the materials you need for a new drain assembly in a kit at any hardware store for less than about $20 to $30.
Replace Kitchen Sink Pipes
Step One – Take the Old Drain Apart
Disassemble the existing drain assembly so you can remove the strainer, which most likely is the leaky culprit. In the picture below, the strainer is the black section just below the white bottom of the sink. Turn the slip nuts counterclockwise, as shown. Be aware that you should use the second set of pliers that are gripped/clamped onto the pipe section below the wrench shown, to keep the pipes from turning. You only want the slip nut to turn, not the whole drain pipe assembly.
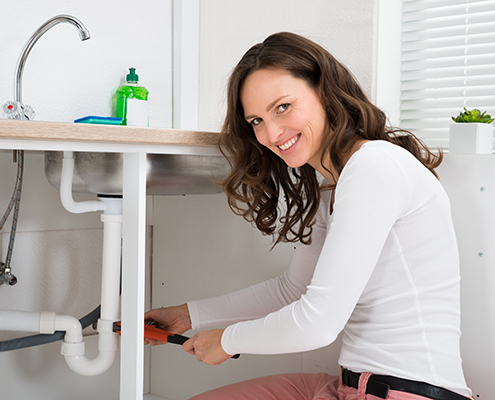
Once you’ve unscrewed the slip nuts all the way, drop the pipe assembly down and remove it.
Now, the primary seal around a basket strainer is plumber’s putty between the top flange of the strainer and the drain hole in your kitchen sink; this will not last forever. Over the years it can harden, shrink or crack. Sometimes you can stop a leak by tightening the locknut. But in many cases, the only cure is a new dose of putty.
The Hardest Part
The hardest part of removing the strainer is unscrewing the old locknut (on the underside of the sink). This locknut is what holds the strainer in place. If you happen to have a “third hand” available, you can have your helper place a pair of pliers in the strainer holes from the above with a screwdriver between the two handles of the pliers in order to keep the strainer from turning while you’re trying to loosen the locknut below.
This locknut is often “welded”/sealed in place by mineral deposits or corrosion. There is a special wrench designed just for locknuts, called a “spud wrench” or “locknut wrench“. Big slip-joint pliers with a 3-1/2 inch jaw opening will also work; plus, you can then use these pliers for other jobs as well. Whatever tool you use, you might find that the locknut won’t budge. In that case, a single cut of the locknut with a hacksaw blade is the only solution. Note that it’s almost impossible to do this without cutting into the strainer threads; so, of course, you’ll need a new strainer.
Step Two – The Basket Strainer Assembly
 The photo to the left shows the washers and locknut that connect the basket assembly. It will give you a clear picture of the parts that make up the basket strainer assembly.
Now, use the rubber and cardboard washers, the new locknut and plumber’s putty to install the new strainer assembly. Dropping the strainer in from above the sink, place the plumber’s putty between the flange of the strainer and the top of your sink around the perimeter of the hole. With the rubber washer and the cardboard washer positioned between the top of the locknut and the underside of the sink, screw the locknut into place. Be sure to clean up any of the excess plumber’s putty that may squeeze out around the lip of the strainer.
Step Three – The Next Step is to Connect the Drain Pipe Assembly Tailpiece to the Strainer
Attach the tailpiece to the basket strainer with the tailpiece washer between the bottom of the strainer and the tailpiece pipe. However, do not fully tighten it yet; you’ll have to remove it later to cut it.
You may have a side outlet assembly or a center outlet assembly. Whichever you have, the parts required for either configuration can be purchased at your local hardware store. There are kits for both the side outlet assemblies or center outlet assemblies (where the trap is beneath the center of the sink), and they should contain most of the essential parts. But you may also need some additional items (as listed below):
- Longer pipe tailpieces (the tailpieces that come with these kits are often only a couple of inches long).
- A trap arm pipe extender (the arm that comes with the kit may not reach the drainpipe that protrudes from the wall).
- A wye pipe piece that has a connection to your dishwasher hose if you have a dishwasher.
- A “disposer kit” that allows the waste arm pipe section to connect to a garbage disposer if you have one.
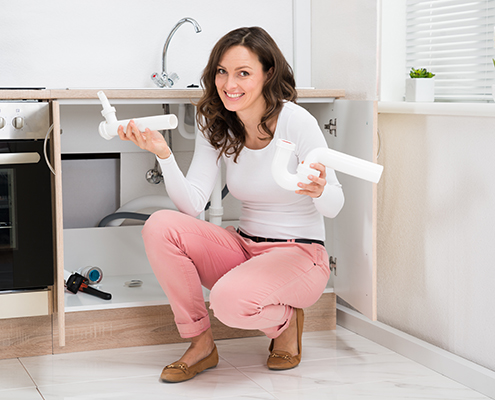
Know that you’ll have to cut a few of the new PVC pipe sections; those being both tailpieces, the waste arm and maybe the trap arm. A fine-tooth hacksaw works best. This image shows all of these pipe sections as described above.
When in Doubt…
When in doubt, mark and cut the pipes a bit long. Better to cut twice than cut too short and have to make an extra trip to the hardware store.
Don’t forget to insert tailpiece washers. Other joints require cone washers. The only joint without a washer is the ground joint at the trap. Again, all are shown via the link above. Assemble everything loosely until the whole assembly is complete. Then tighten all the slip nuts. The slip nuts should be hand tightened. If any joints leak, however, after you test the new assembly, tighten them a little more, but only slightly with the slip-joint pliers. Take care to not over tighten! Over tightening may crack the PVC pipe which will lead to another extra trip to the hardware store.
Installation
You may have to install a new adapter on the waste drainpipe and use a rubber coupler to connect the PVC pipe to the steel drainpipe.The rubber coupler connects the PVC pipe to the steel drainpipe. Now, the existing drainpipe coming out of the wall should have an adapter on the end of it. This adapter should have a washer and slip nut and work just like the other joints in your drain assembly. If your drainpipe is plastic, you shouldn’t have any problems. But if your drainpipe is old galvanized steel, you might run into corrosion that makes the slip nut almost impossible to loosen or retighten.
If that’s the case, then you’ll have to bypass these rusty old threads. Unscrew the old slip nut if you can. If you can’t, then cut it off with a hacksaw, but try not to cut too deep into the drainpipe’s threads. Then, you’ll have to purchase a plastic trap adapter, a rubber transition coupler (like a car radiator hose coupler/connection), an additional section of plastic pipe, and cement. The pipe and adapter can be PVC (white) or ABS (black); it is important to be sure to get the right cement for the type of plastic (PVC also requires “purple primer”). Cement the adapter to a 4-in. piece of straight pipe and then join the plastic pipe to the old metal pipe using the rubber coupler.
Step Four – When You’re All Done, Test the New Assembly for Leaks
You may run into problems replacing your kitchen sink pipes. Remember that Proudfoot Plumbing, Heating and Air is always available to help. Call us at 412 461 2198 or contact us. We will be glad to come to your home and assist!
Image credits – Adobe Stock
