
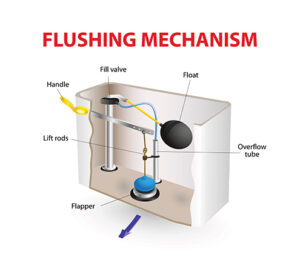
Toilet Fill Valve: How to Replace it Yourself
As everyone knows a “runny” toilet can be pretty annoying along with using more water than necessary and having to pay for it. This could be caused by a faulty fill valve that needs to be replaced so that the water quits running.
To replace your toilet fill valve, follow the instructions below.
Disconnecting the Supply Line
- Turn off the water at the shutoff valve (usually near the floor below the tank) and drain the tank by flushing the toilet.
- Place a small basin/bowl below the toilet tank to catch any excess water left in the tank; soak up any remaining water left inside the tank with a sponge (the tank will not drain completely by flushing).
- Disconnect the old supply line located underneath the tank (above the shutoff valve) by turning the “lower” of the two nuts in this location counter-clockwise.
Removing the Old Toilet Fill Valve
- Remove the fill valve locknut that is flush against the underside of the tank by turning it counter-clockwise (this is the “upper” of the two nuts), located just above the supply line and the “lower” nut (as described above).
- Remove the fill valve from the inside of the tank.
- Take the old fill valve to the hardware/plumbing supply store with you so you know what type of new fill valve to purchase!
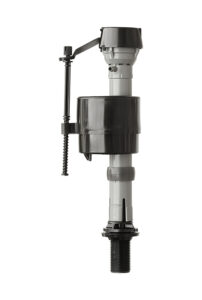
- Make sure the new fill valve has the shank attached along with the shank washer in place as shown in the two diagrams below.
Adjusting New Toilet Fill Valve
Gently place the bottom threaded shank portion of the new fill valve inside the tank into the hole from where the old fill valve was removed in order to measure for adjustment.
Adjust the height of the valve by following the manufacturer’s instructions included with your new valve purchase. Just above the valve’s bottom threaded shank should be a straight shank section. You should see larger threads on it for twisting to adjust the height of the fill valve. There should be a marking near the top of the new valve (similar to that shown in the diagram above). The valve should be adjusted so that the mark is at least/about 1 inch above the overflow tube. The manufacturer’s instructions should always be followed when doing this adjustment as it may not be the same for all valves.
Once Adjusted, Insert New Toilet Fill Valve and Connect Supply Line
- Insert the new fill valve into the tank opening and screw the fill valve locknut onto the threaded portion sticking out the bottom of the hole in the tank.
- Very gently push down on the valve shank portion above the bottom of the tank. Tighten the locknut one-half turn beyond hand tight. Do not over tighten as the tank may crack!
- Reconnect the supply line with its nut and tighten this “lower” of the two nuts by turning clockwise.
Attaching Refill Tube
- Inside the tank, attach the plastic/rubber refill tube and its angle clip adaptor to the vertical overflow pipe. Trim the refill tube if necessary to avoid any kinks in the tube
Adjusting Water Level
- Turn the water back on.
- Allow the tank to fill and check for leaks on the underside of the tank.
- Although it should not be necessary, you can typically adjust the water level in the tank. Squeeze an adjustment clip on the side of the float and move the float up or down. On some models, the float is adjusted by using a threaded screw sitting next to the float.
Summary – changing your Toilet fill valve
In summation, although the above process appears to be simple enough, there are always things that go wrong when doing-it-yourself plumbing repairs. Proudfoot Plumbing, Heating and Air is quite familiar with these types of problems and plumbing repairs. We have the necessary experience for doing this repair quickly and to the customer’s satisfaction. Please give us a call at 1-888-461-2198 or contact us. We will be glad to help out and/or make recommendations for you on the repair of your existing toilet or for the installation of a new one.
References: homedepot.com, walmart.com
Image Credit – Adobe Stock
